
429 Too Many Requests

429 Too Many Requests


nginx

Efficient production of a zirconia overdenture

Case by CDT Mathias Berger, France


Every patient is unique. Their specific backgrounds, functional needs and aesthetic demands need to be respected in any prosthodontic treatment plan. However, the importance of an individual treatment approach increases with the number of teeth to be replaced: After all, the impact of the restorations on facial aesthetics and on the patient’s quality of life is never greater than when all teeth are missing. Fortunately, adequate dental materials and techniques are available for a patient-centered, individual approach, no matter what challenges need to be overcome.


A patient with bruxism


In the present case, an elderly male patient with bruxism was in need of a new maxillary denture. Since the placement of five implants in the maxilla, he had no proprioception in this jaw. This lack of sensation had an impact on the overdenture to be produced: material and design needed to be carefully selected in a way that it would withstand uncontrolled chewing forces. As technical complications are easier to repair than biological complications, the overdenture should not be unbreakable – instead, the replacement of single units should be easily manageable.


Two-part denture design


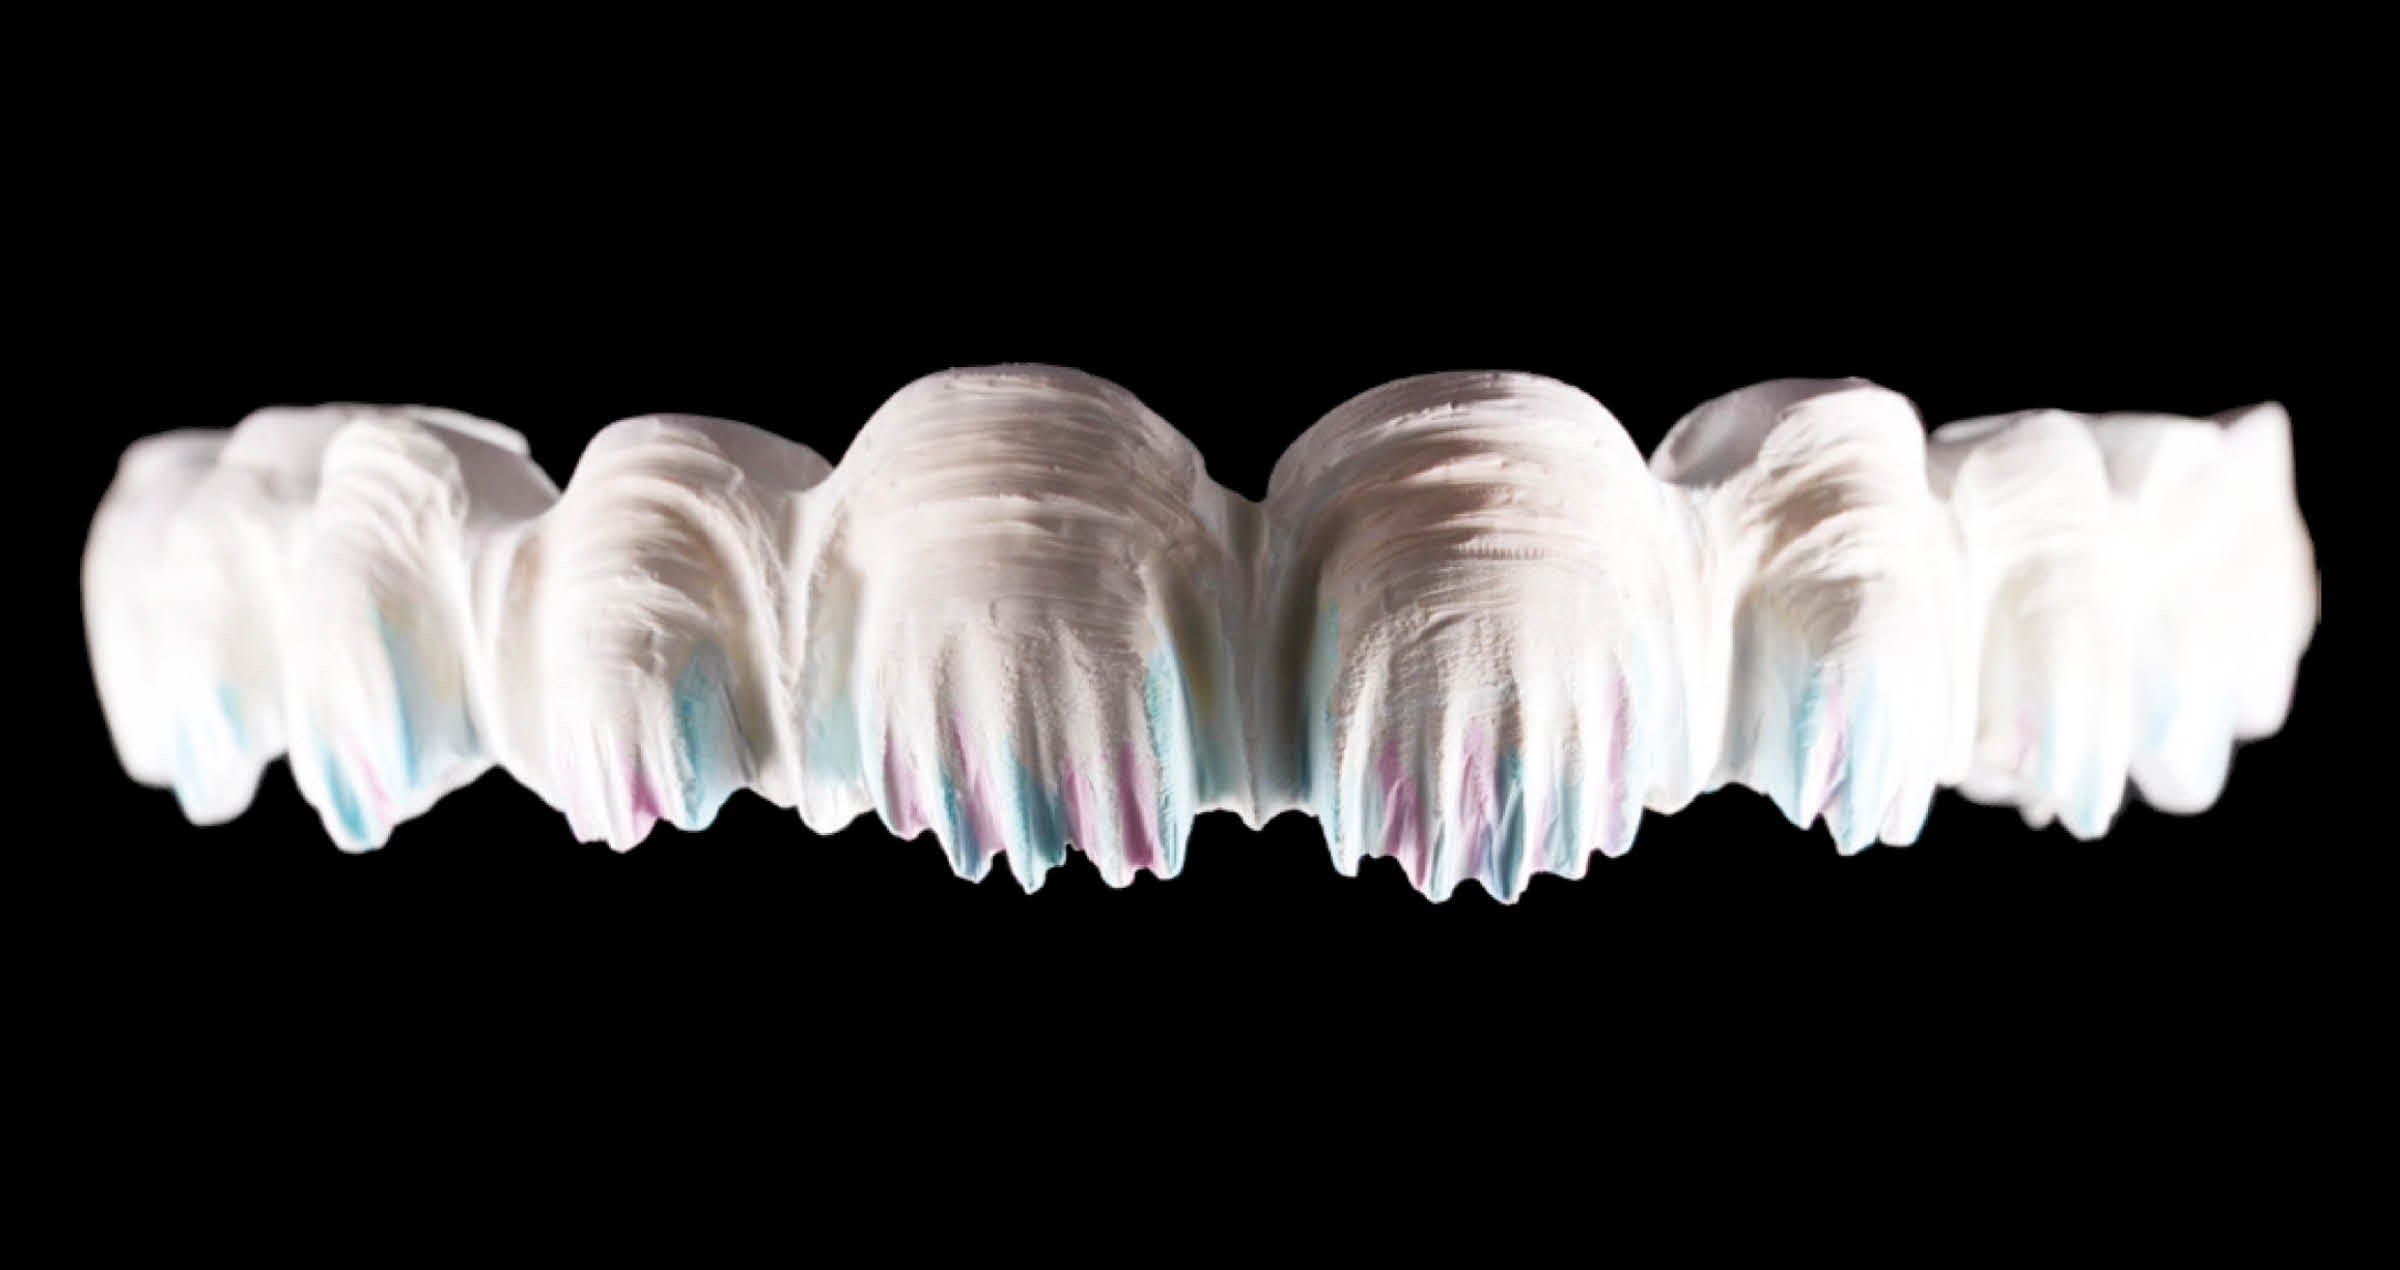
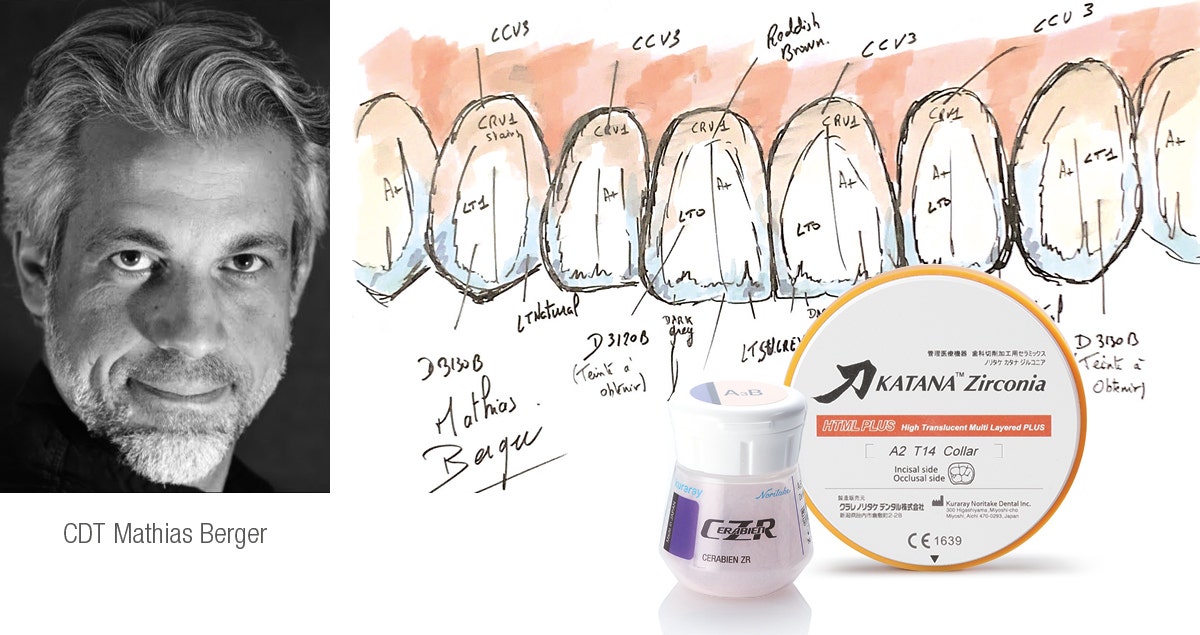
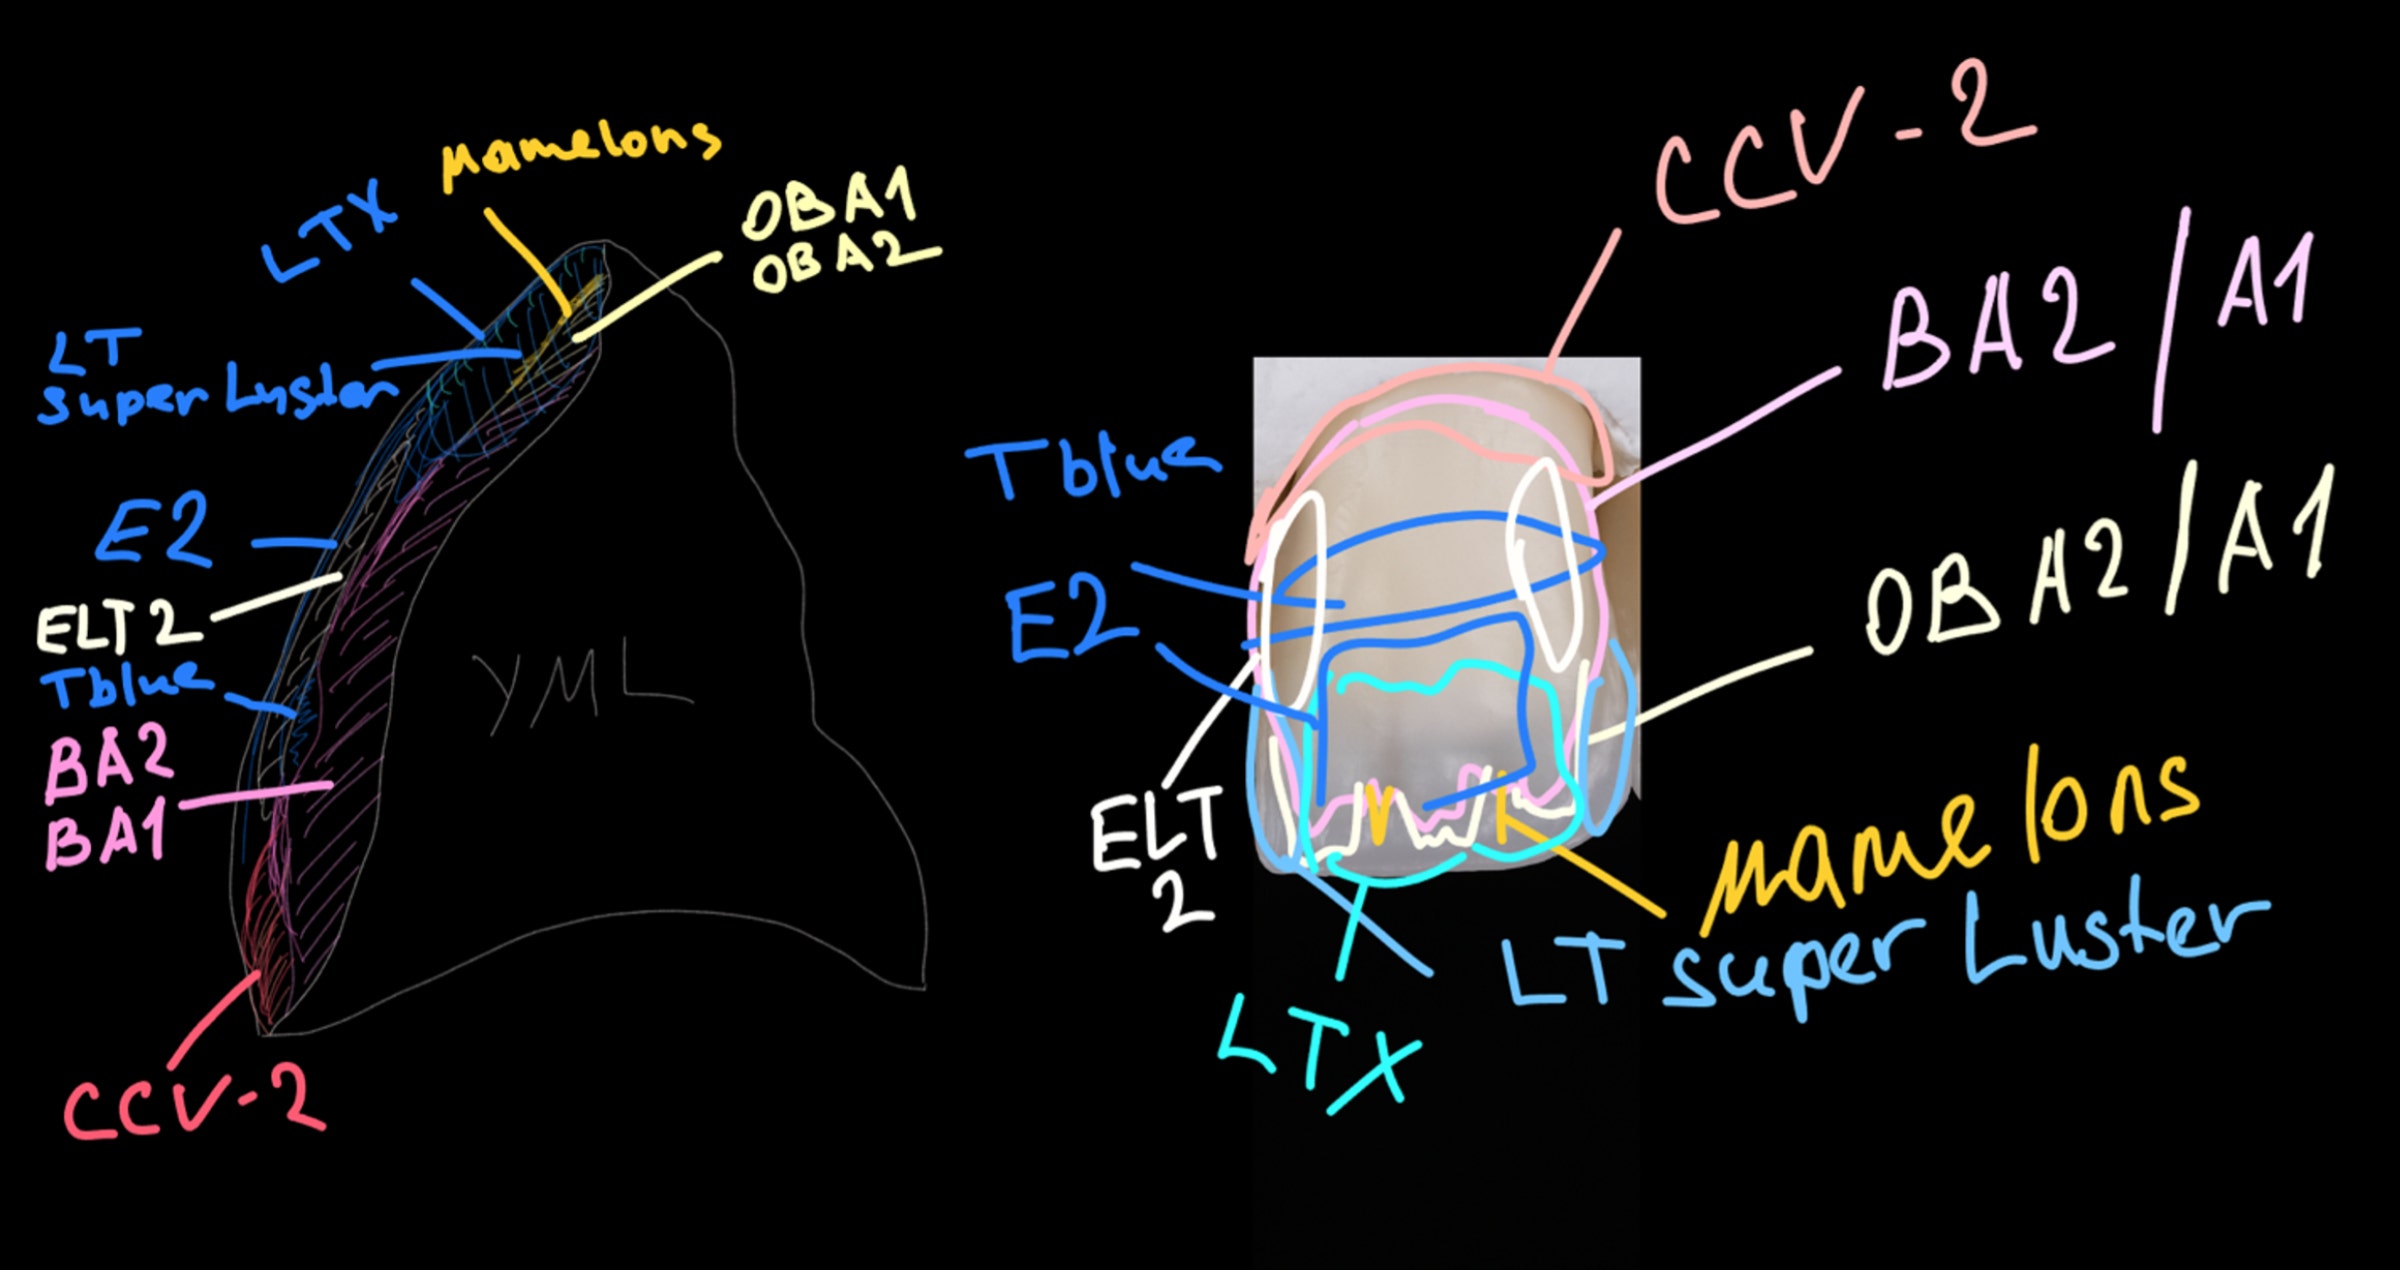
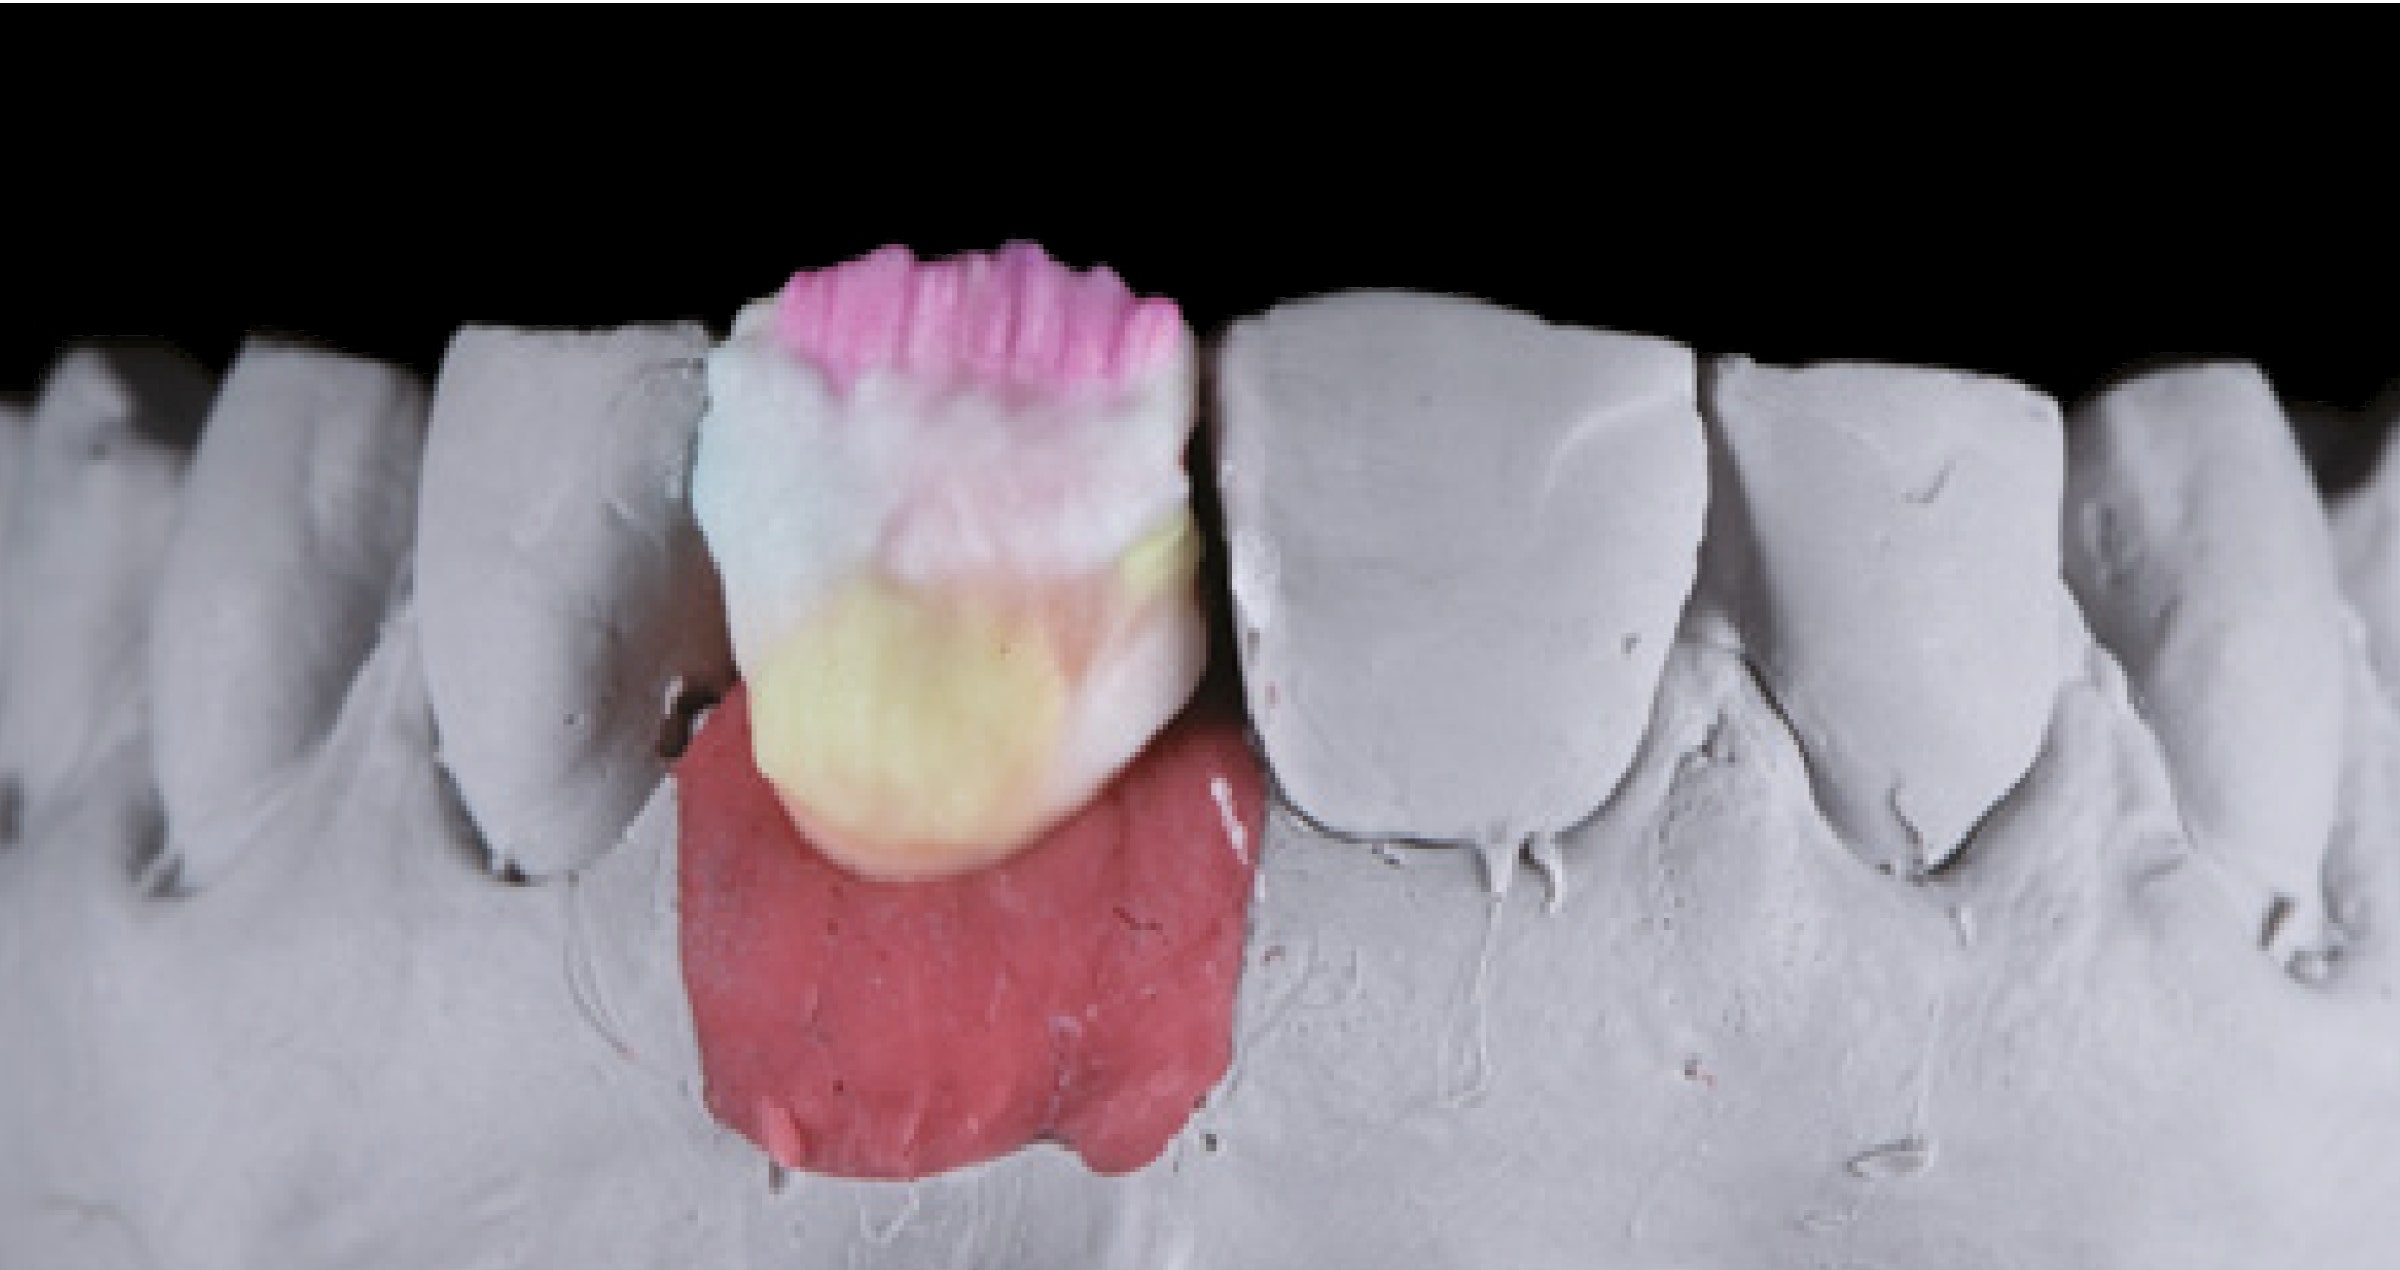
The solution was a two-part design with a milled bar consisting of the gum area and tooth abutments (fig. 1) combined with single crowns. The material of choice for the bar was KATANA™ Zirconia HTML Plus (Kuraray Noritake Dental Inc.) with a uniform flexural strength of 1,150 MPa throughout the disc, while the single crowns were milled from KATANA™ Zirconia YML that offers natural translucency and strength gradation. While a monolithic design was selected for the posterior crowns, the six crowns for the anterior region received a micro-cutback for aesthetic micro-layering with CERABIEN™ ZR Porcelain. The shade scheme for individualization of the anterior crowns is shown in fig. 2. In a nutshell, customization was performed with the Internal Stains Cervical 1, Grayish Blue, Dark Grey and A+. The finishing layer on the incisors was created mainly using LT0 materials with some CCV-3 on the cervical and LT Natural on the mesial and distal lobes. On the canines, LT1 was used instead of LT0. The posterior crowns were merely finished with liquid ceramics (CERABIEN™ ZR FC Paste Stain, Kuraray Noritake Dental Inc.).


Fig. 1. Sintered bar milled from KATANA™ Zirconia HTML Plus.


Fig. 2. Chroma map for micro-layering in the anterior region.


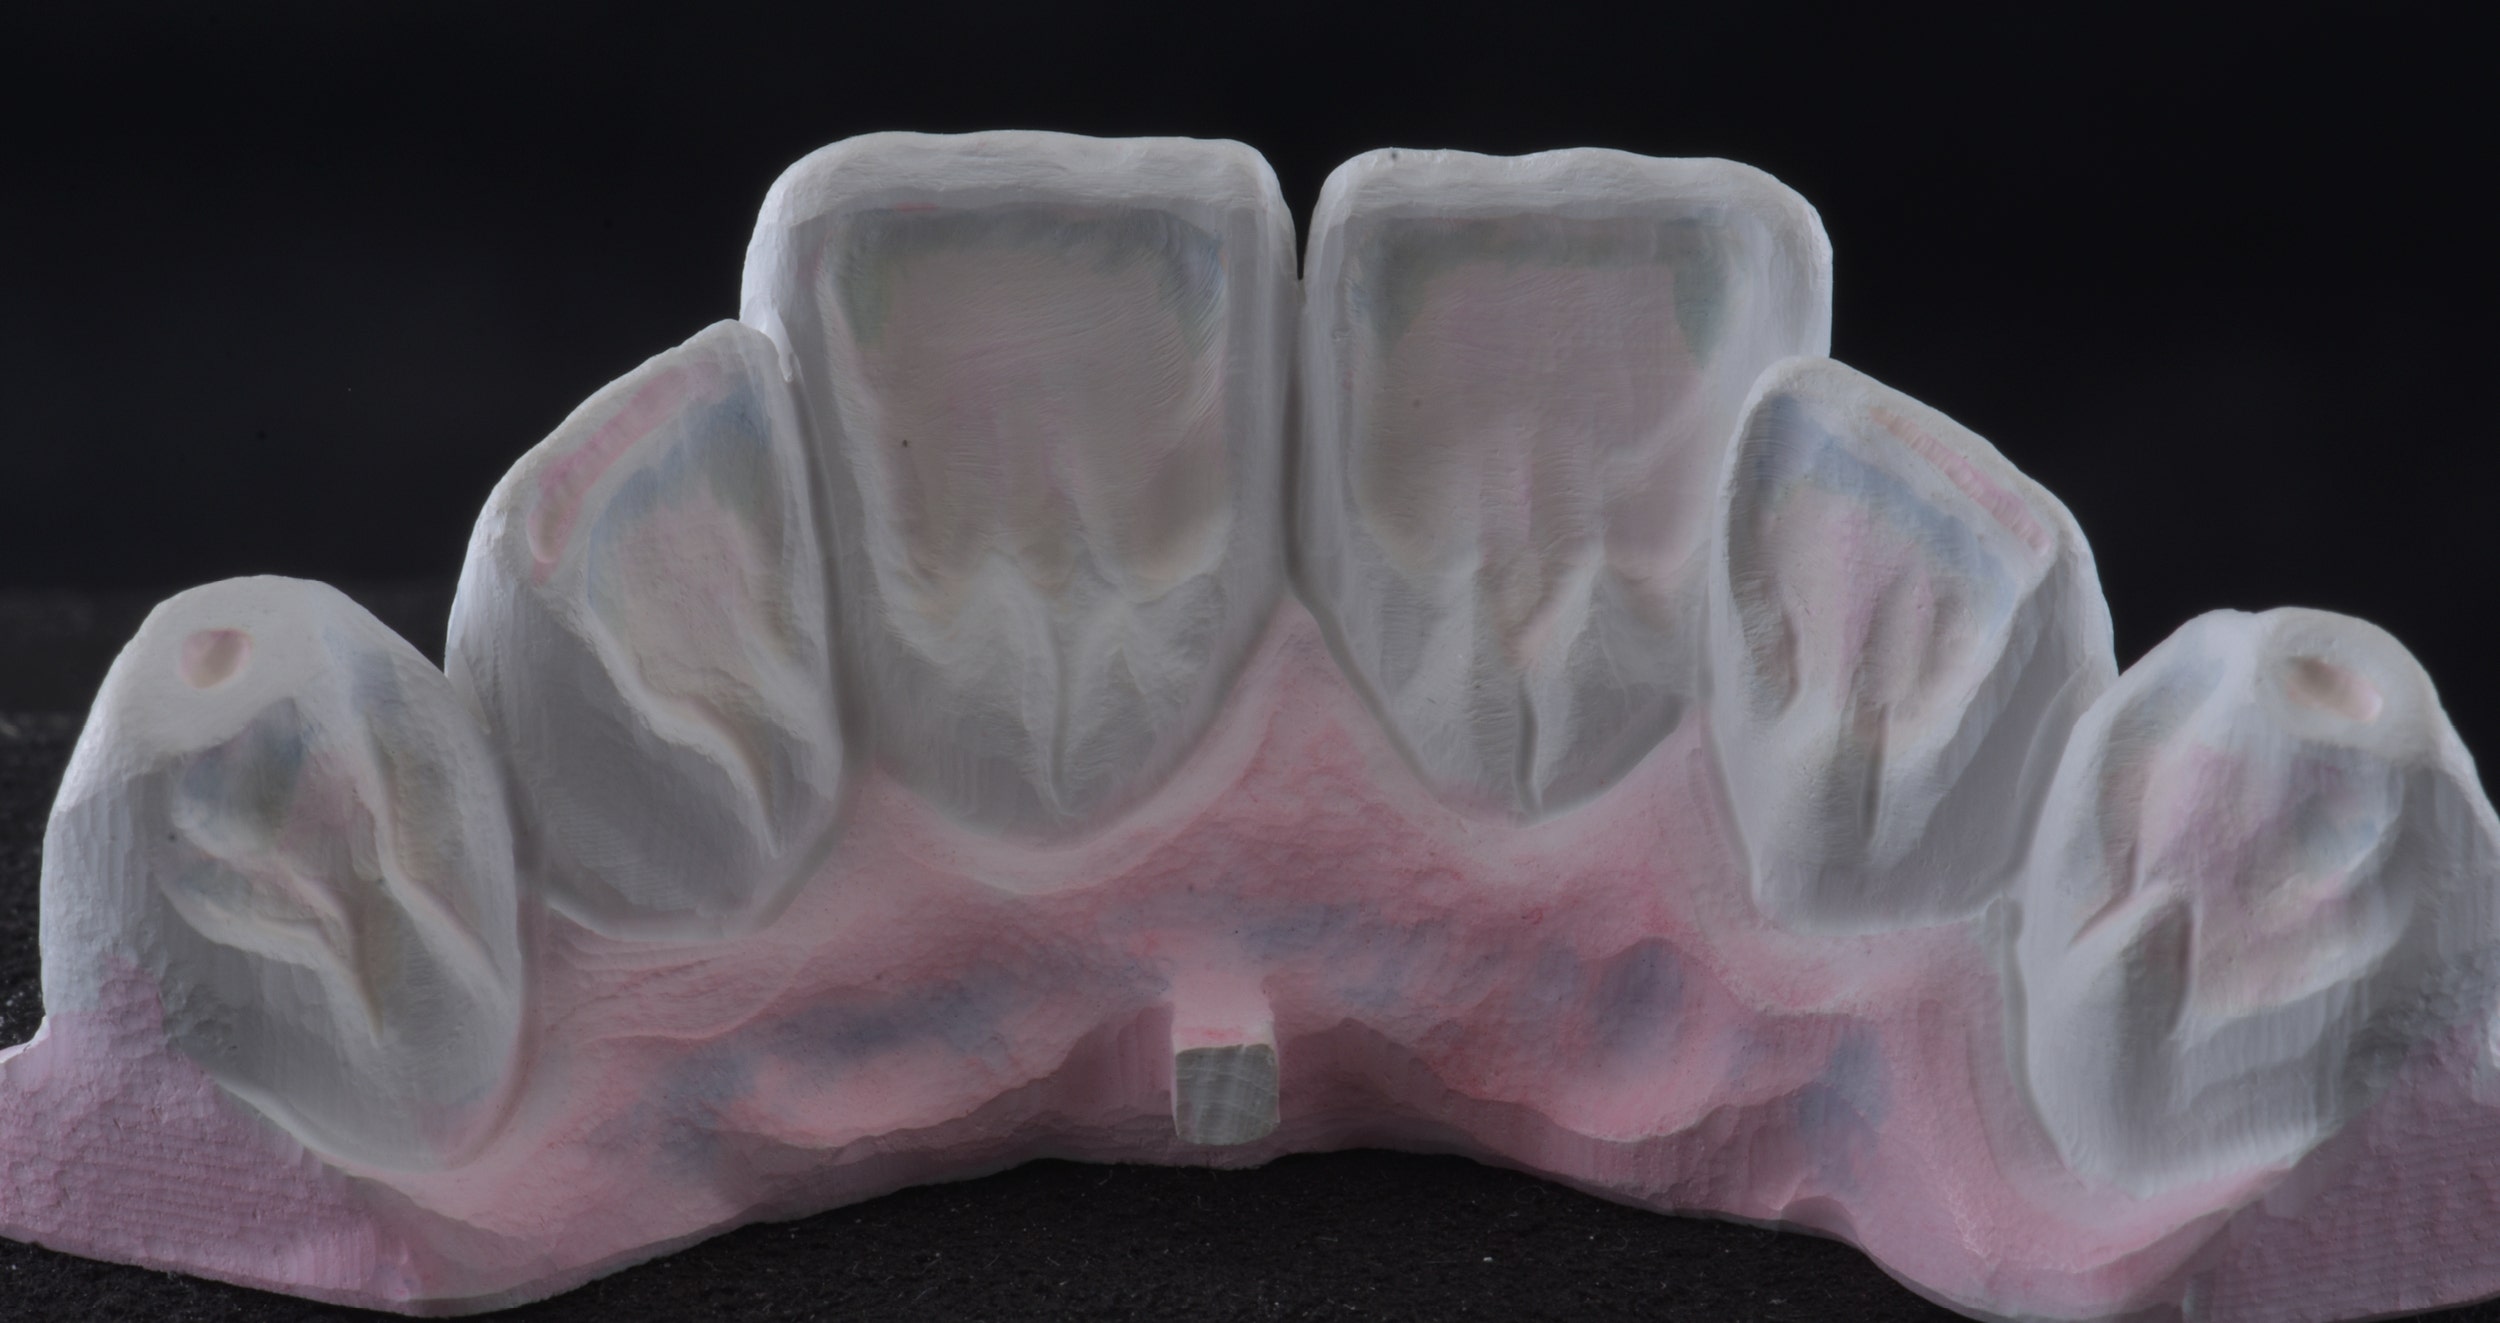
Fig. 3 shows the finished single crowns with their individual, age-appropriate shade effects on the sintered bar. After checking the fit of the crowns, the gum areas of the bar were individualized using CERABIEN™ ZR Tissue Porcelain (fig. 4). Subsequently, the crowns were luted to the zirconia abutments (fig. 5), leaving screw access holes in aesthetically uncritical positions (fig. 6). The final overdenture ready for try-in is shown in fig. 7. Due to an excellent fit on the implants (fig. 8), it was possible to immediately fix the overdenture with the screws, close the access holes with composite and discharge the patient. The final appearance is shown in fig. 9.


Fig. 3. Finished crowns on the sintered bar.


Fig. 4. Bar with individualized gum areas.


Fig. 5. Placement of the central incisor crowns on the bar.


Fig. 6. Occlusal screw access hole in the finished overdenture.


Fig. 7. Overdenture ready for try-in.


Fig. 8. Intraoral try-in of the aesthetic overdenture.


FINAL SITUATION


Fig. 9. Treatment outcome.


CONCLUSION


This patient case is a good example of how important it is to respect the patient’s background, age and specific demands when producing dental restorations. Thanks to the great variety of restorative materials with different mechanical and optical properties available, it is possible to create suitable prosthetics for virtually every patient. However, for this purpose, it is important to stay up to date regarding new products launched and techniques developed. This way, it is often even possible to create beautiful and durable solutions in a simplified and efficient procedure such as micro-layering on innovative zirconia with a high aesthetic potential.
 

A new smile with only 4 zirconia crowns

Case by Kosti Vyshamirski


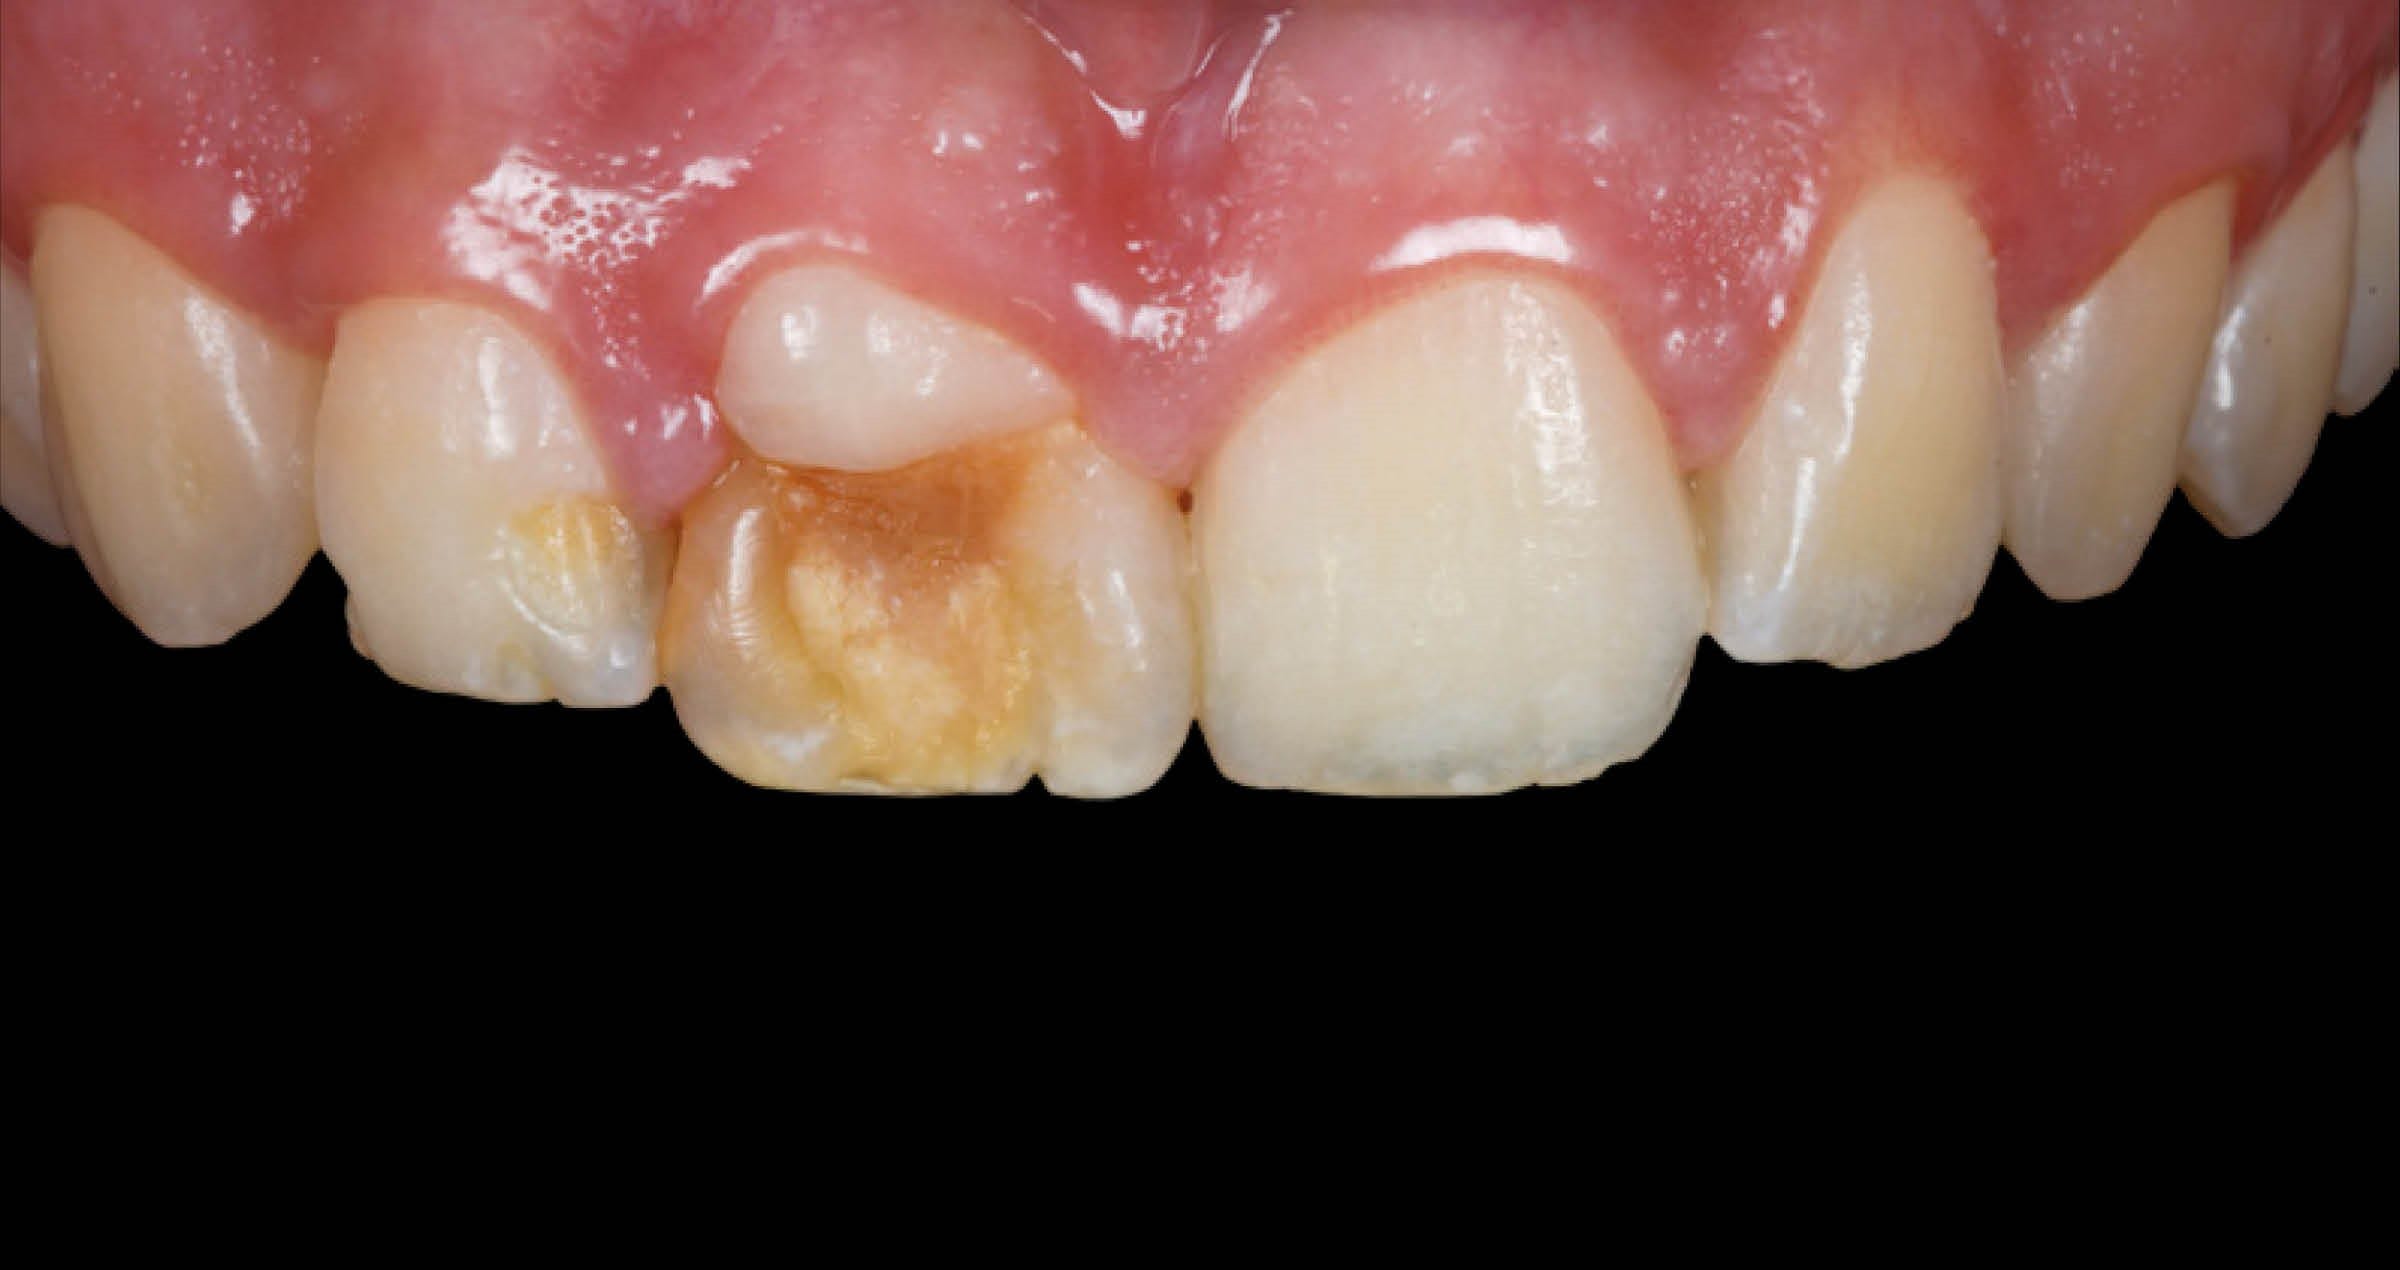
A male patient (47 years of age) presented to his dentist with severe damage to his teeth. His main request was to increase aesthetics, to achieve a more pleasing envisaged aesthetic area. A side request was to achieve a ‘whitening but natural look’. This was achieved by using a lighter colour palette of zirconia and porcelain materials.


The final result was achieved through the creation of a wax-up, followed by a mock-up, provisional restoration and finally adhesive bonding of the zirconia crowns.


INITIAL SITUATION


Fig. 1. Initial situation. Male patient (47 years of age).


Fig. 2. Planning the new smile according to patient’s aesthetic and functional parameters.


Fig. 3. Mock-up in place to check the new look in the patient’s mouth.


Fig. 4. KATANA™ Zirconia YML shade A1 crowns with labial cutback after milling.


Fig. 5. Crowns after sintering on the plaster model.


Fig. 6. Noritake CERABIEN™ ZR porcelain layering map.


Fig. 7. Finishing the labial surface using both polishing and selfglaze. On the palatal side of the crowns only CERABIEN™ FC Paste Stain stains and glaze were used for finishing. To aid in optimisation of the soft tissue condition the palato-cervical and near proximal areas were polished.


Fig. 8. Finished crowns on the plaster model.


Fig. 9. Try-in using PANAVIA™ V5 White try-in paste, to confirm the proper appearance. For the final adhesive cementation PANAVIA™ V5 White has been used.


FINAL SITUATION


Fig. 10. Situation after seven months. The result is aesthetically pleasing and the gingival condition excellent.


Fig. 11. Recall after 1.5 years.


Copying nature with high performance materials

Clinical Case by DT Ghaith Alousi


What does it take to reconstruct teeth according to the patient’s individual sense of beauty? Experience shows that copying nature is the secret of success. To become a good duplicator, it is essential to develop an eye for detail with regard to tooth forms, surface morphology and the internal colour structure of the teeth to be copied. In addition, the duplicator needs to develop an understanding of the materials and tools used to copy those details. The last key success factor is taking pleasure in interacting with patients.


Read the clinical case created by Ghaith Alousi and published in the LabLine magazine’s Autumn edition now and learn about his approach to creating aesthetic restorations, mimicking nature and truly individualising restorative treatments.


Complex implant-supported maxillary reconstruction

Clinical Case by MDT Mathias Berger


Highly reliable implants, advanced surgical techniques and innovative restorative materials, designs and approaches: modern implant dentistry has evolved into a predictable discipline producing aesthetic and functional outcomes, which are successful in the long term. Asking patients what they expect from a complex implant-supported reconstruction in the maxilla, natural aesthetics and biocompatibility are often demanded apart from functional aspects. With modern zirconia materials that offer the flexural strength required and well-balanced aesthetics, these demands are easily met.


The following case example is used to demonstrate how to maximise the potential of the recently introduced KATANA™ Zirconia HTML PLUS (Kuraray Noritake Dental Inc.), a multi-layered zirconia and the successor of KATANA™ Zirconia HTML with further improved strength and aesthetics. A special cutback design refined with hand instruments, shading with Esthetic Colorant for KATANA™ Zirconia and micro-layering with CERABIEN™ ZR porcelains (both Kuraray Noritake Dental Inc.) led to a quite natural result.


Start now reading the clinical case of MDT Mathias Berger by clicking image below!


Equipa de sonho

A combinação de líquidos de efeito e microestratificação em zircónia altamente estética é a forma eficaz de obter resultados excecionais.


Caso por Leonidas Dimitriou, MDT

Como complemento ao seu portfólio bem alinhado de zircónia multicamadas (série KATANA™ Zirconia Multi-Layered) e cerâmica de facetas para zircónia (CERABIEN™ ZR), a Kuraray Noritake Dental Inc. introduziu recentemente um conjunto de líquidos de coloração. O Esthetic Colorant for KATANA™ Zirconia é aplicado na superfície da restauração de zircónia monolítica ou anatomicamente reduzida antes do procedimento de sinterização final. Desta forma, é possível imitar facilmente os efeitos de cor internos típicos dos dentes naturais. Dependendo do resultado desejado, os utilizadores podem adicionar apenas uma camada final de glaze, cerâmica líquida ou stains e cerâmicas às suas restaurações de zircónia tratadas com Esthetic Colorant. Os dois exemplos de casos seguintes são utilizados para demonstrar dois procedimentos diferentes que envolvem a utilização dos líquidos de efeito.


EXEMPLO DE CASO 1

No primeiro caso, produzimos três restaurações de dois elementos para seis dentes anteriores do maxilar. As coroas de zircónia (feitas de KATANA Zirconia YML) foram anatomicamente reduzidas e individualizadas com Esthetic Colorant principalmente nas áreas incisais e cervicais imediatamente após a fresagem. Para a aplicação dos líquidos selecionados, utilizámos a Liquid Brush Pen especificamente desenvolvida para o Esthetic Colorant. As restaurações foram secas durante meia hora, colocadas no forno de sinterização para sinterização de acordo com o protocolo recomendado para a KATANA Zirconia e subsequentemente acabadas com cerâmicas CERABIEN ZR. Finalmente, foi aplicado o CERABIEN™ ZR FC Paste Stain Glaze para o acabamento final de alto brilho.


Fig. 1. Coroas pré-sinterizadas anatomicamente reduzidas após a fresagem.


Fig. 2. Corante Esthetic Colorant aplicado nas restaurações fresadas.


Fig. 3. Aspeto das restaurações individualizadas após o procedimento de sinterização final.


Fig. 4. Restaurações após a estratificação em cerâmica.


Situação final


Fig. 5. Restaurações finais com um aspeto natural. Os efeitos criados com o Esthetic Colorant brilham a partir do interior das restaurações.


Fig. 6. Vista lateral das restaurações finais a partir da esquerda.


Fig. 7. Vista lateral das restaurações finais a partir da direita.


EXEMPLO DE CASO 2

Neste segundo caso, foram produzidas duas restaurações de três elementos utilizando KATANA Zirconia YML na cor A3. Desenhámo-las e fresámo-las em contorno total, depois reduzimo-las com instrumentos manuais em 0,2 mm e adicionámos alguns efeitos de textura à superfície antes de aplicar o Esthetic Colorant. Neste caso, brincámos com diferentes tonalidades de Esthetic Colorant. Mesmo quando aplicado numa superfície minimamente reduzida ou monolítica, os líquidos são capazes de criar um efeito de profundidade agradável à medida que se difundem na estrutura de zircónia. A quantidade de líquido aplicado é facilmente controlada com a caneta Liquid Brush Pen, de modo a que a intensidade das cores seja previsível. Após a sinterização, adicionámos alguns pigmentos internos, cerâmica CERABIEN ZR Luster e uma camada final de CERABIEN ZR FC Paste Stain Glaze para terminar as restaurações. O resultado fala por si.


Fig. 8. Restaurações monolíticas fresadas com uma textura de superfície pronunciada.


Fig. 9. Superfícies vestibulares e palatinas individualizadas com Esthetic Colorant para criar e intensificar alguns efeitos de cor naturais.


Fig. 10. Aspeto das restaurações imediatamente após a sinterização.


Fig. 11. Restaurações após maquiagem interna.


Fig. 12. Uma camada de cerâmica Luster aplicada às restaurações minimamente reduzidas.


Situação final


Fig. 13. Resultado final após o glazeamento.


Técnico dentário:

LEONIDAS DIMITRIOU, MDT


Caso estético na revista LabLine

A revista LabLine é uma publicação de língua inglesa que se destina ao campo da medicina dentária em laboratório. Fornece uma cobertura abrangente das mais recentes técnicas e tendências em tecnologia e materiais de laboratório dentário, apresentando-as através de casos clínicos sofisticados, desafiantes e estéticos realizados por alguns dos especialistas mais conhecidos na Europa. Com o seu conteúdo selecionado por especialistas, a LabLine serve como um recurso inestimável para profissionais de medicina dentária que procuram melhorar os seus conhecimentos e manter-se na vanguarda da indústria.

Na edição SPRING da LabLine pode encontrar um maravilhoso CASO ESTÉTICO de Mikel Villar Gonzales e DT Pilar Ballesteros Galan. A paciente, uma mulher de 21 anos de idade, tinha um defeito de hipoplasia nos seus dentes permanentes 1.1 e 1.2, presumivelmente devido a um trauma nos seus dentes anteriores decíduos. Clique na imagem abaixo e veja como o caso foi realizado!


Aesthetic case

LabLine magazine is an English language publication catering to the field of lab-side dentistry. It provides comprehensive coverage of the latest techniques and trends in dental laboratory technology and materials, showcasing them via sophisticated, challenging and aesthetic clinical cases done by some of the most known experts in Europe. With its expertly curated content, LabLine serves as an invaluable resource for dental professionals seeking to enhance their knowledge and stay at the forefront of the industry.


In the SPRING edition of LabLine you can find a wonderful AESTHETIC CASE by Mikel Villar Gonzales and DT Pilar Ballesteros Galan. The patient, a 21-year-old female had a hypoplasia defect on her permanent teeth, 1.1 and 1.2., presumably due to trauma on her deciduous anterior teeth. Click the image below and check out how the case was done!


KATANA™ Zirconia & Esthetic Colorant

TIPS AND TRICKS


Case by MDT Daniele Rondoni and MDT Roberto Rossi


Recently, Kuraray Noritake Dental Inc. has introduced Esthetic Colorant for KATANA™ Zirconia – dyeing liquids applied after milling of the company’s multi-layered zirconia. Enthusiastic users of the KATANA™ Zirconia Multi-Layered Series may wonder when and how to use the innovation: In combination with external stains, veneering porcelains or liquid ceramics, or as a replacement of those products? On the monolithic surface or on a dentin structure (framework)? And how much liquid produces the desired effect? Some technical guidance is provided in this article.


The good news: Esthetic Colorant fits perfectly into any existing approach, no matter whether you prefer a full-contour or cutback design. You may apply the liquids solely in a zero-bake technique – just individualize the milled restorations with Esthetic Colorant, fix the colours during the final sintering procedure and polish the surface. On the other end of the spectrum of options is the use underneath different layers of internal stains, porcelains and glaze.


WE UTILIZE ESTHETIC COLORANT MAINLY FOR THREE PURPOSES:


  1. To add specific individual characteristics to the restoration, which are not generated by the multi-layered material structure, yet difficult to create with internal stains (examples are a more chromatic body area of a canine in comparison to the adjacent lateral incisor or pronounced mamelon structures). As the liquids diffuse into the structure, a depth effect is created.

    Eight liquids are available for the abovementioned purpose: A, B, C and D Plus for changing the brightness and creating shadows, BLUE, GRAY, ORANGE and BROWN for general characterization.
  1. To pre-treat tissue areas to produce a perfectly shaded basis for the application of liquid ceramics (CERABIEN™ ZR FC Paste Stain) or Tissue Porcelain.

    Two liquids are available for this purpose: PINK AND VIOLET.
  1. To prevent a greyish effect caused by the shining through of discoloured abutment teeth or metal parts (posts or implant abutments) – in this case, Esthetic Colorant OPAQUE or WHITE is applied to the intaglio of the restoration. The effect: the incoming light is blocked on the side of the dark element, while the natural translucency in the outer surface area of the restoration is maintained.


PURPOSE 1


An example of how to add specific individual characteristics to the surface of the restoration is the following full-arch case. After sintering, we just added a micro-layer of CERABIEN™ ZR Luster Porcelain and CERABIEN™ ZR FC Paste Stain Clear Glaze.


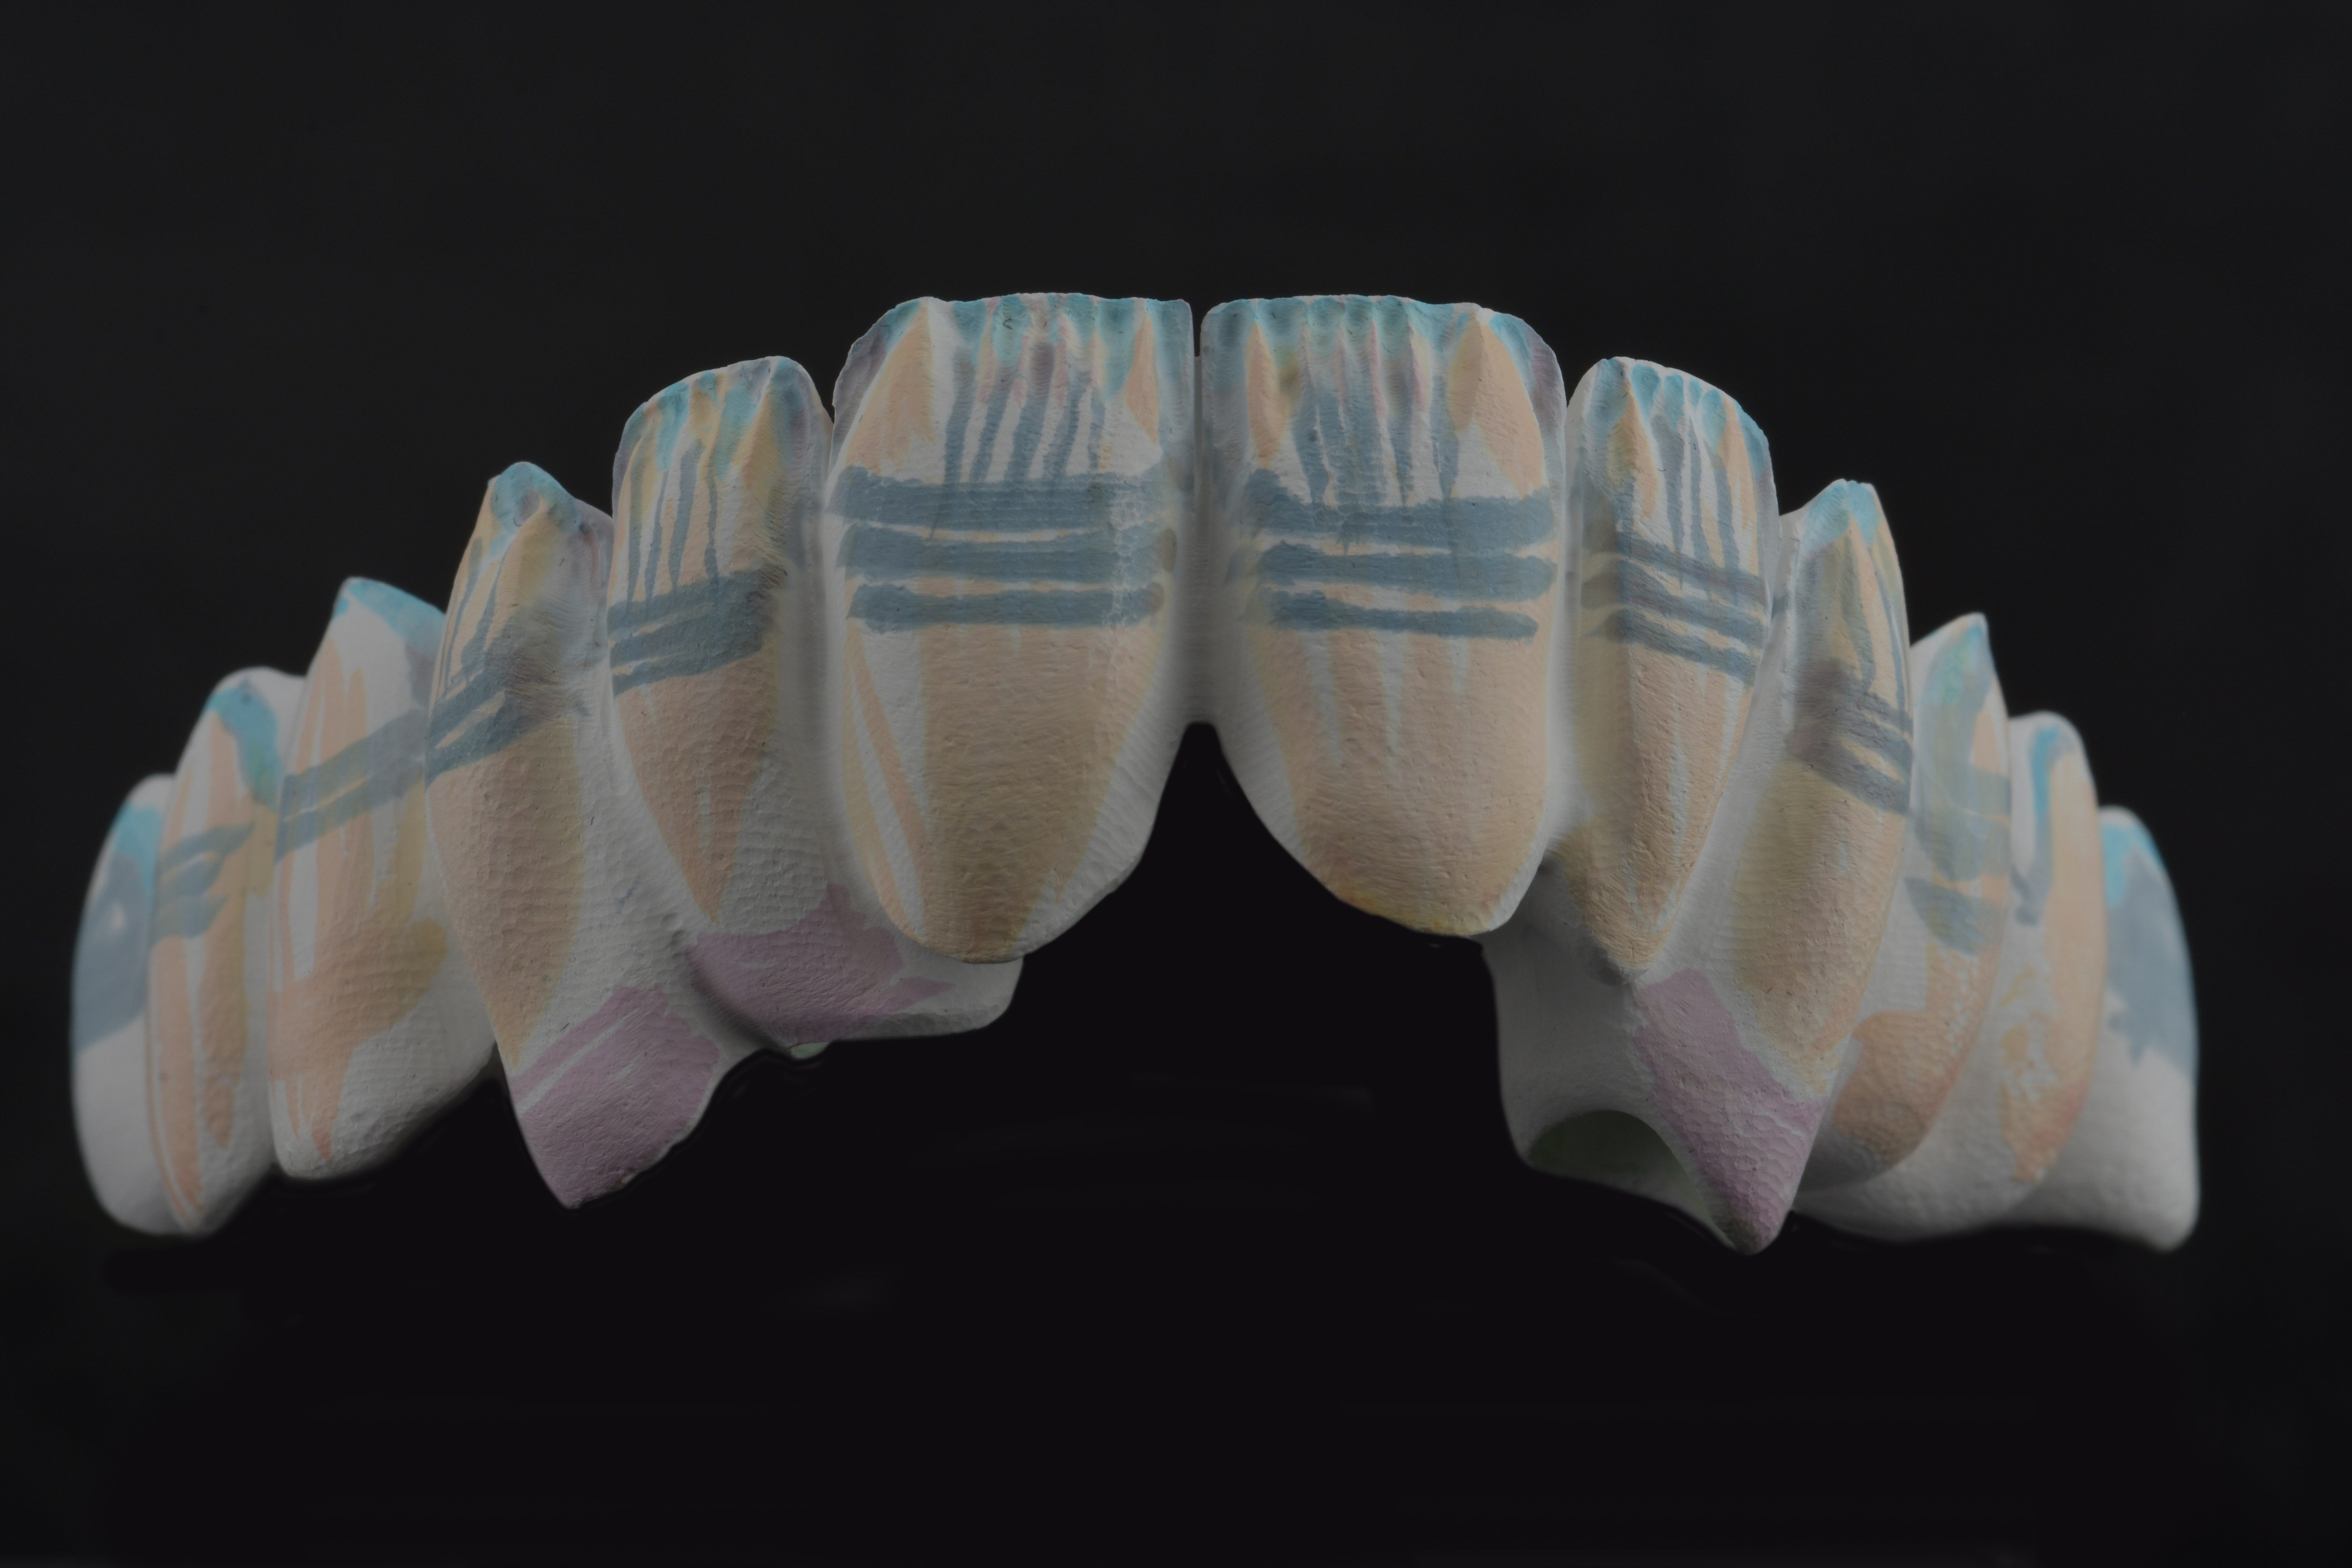
Fig. 1a. Frontal view of the complex restoration made of KATANA™ Zirconia HTML Plus after milling and the application of different shades of Esthetic Colorant.


Fig. 1b. Occlusal view of the complex restoration after milling and the application of different shades of Esthetic Colorant. Important: Every restoration characterized with Esthetic Colorant should be left to dry for at least 30 minutes prior to sintering.


Fig. 1c. Frontal view of the restoration after the final sintering procedure.


Fig. 1d. Occlusal view of the restoration after sintering.


Fig. 1e. Addition of a micro-layer of CERABIEN™ ZR Luster Porcelain.


FINAL SITUATION


Fig. 1f. Frontal view of the definitive restoration finished with CERABIEN™ ZR FC Paste Stain Clear Glaze.


Fig. 1g. Occlusal view of the final restoration.


Fig. 1h. Great incisal translucency.


PURPOSE 2


The effect of a pre-treatment of the tissue area of a complex restoration is illustrated with the aid of the following example case. Again, we opted for a nearly monolithic design with a minimal cutback in the incisal area of the teeth. The appearance of the originally tooth-coloured tissue area is modified visibly through the application of Esthetic Colorant in the shades PINK and GRAY. Some individual effects are added to the teeth as well.


Fig. 2a. Vestibular view of the milled restoration (material: KATANA™ Zirconia YML).


Fig. 2b. Palatal view of the milled restoration.


Fig. 2c. Vestibular pattern of application of Esthetic Colorant.


Fig. 2d. Palatal pattern of application of Esthetic Colorant.


Fig. 2e. Vestibular view of the restoration after the final sintering procedure.


Fig. 2f. Palatal view of the restoration after the final sintering procedure.


PURPOSE 3


Comparison of restorations on an implant abutment with and without Esthetic Colorant (EC):


HOW TO APPLY ESTHETIC COLORANT?


Essentially, Esthetic Colorant may be applied with any metal-free brush or pen. In our opinion, the best results are obtained by using the Liquid Brush Pen that has been specifically developed for the dyeing liquids. The pen’s housing is filled with the selected shade of Esthetic Colorant and allows for a controlled application, as the tip always dispenses the right amount of liquid and does not dry out. We utilize a separate Liquid Brush Pen for every shade that is frequently in use.


SINTERING PARAMETERS


After drying, which is essential for a good outcome, the restorations treated with Esthetic Colorant may be put into the sintering furnace and sintered according to the schedule recommended for the KATANA™ Zirconia Multi-Layered series. The parameters do not need to be adjusted.


CONCLUSION


The controlled application of Esthetic Colorant is easily accomplished by using the appropriate equipment, while the desired effects are obtained predictably. The liquids’ ease of use, the appropriate number of shades available and the achievable effects are just a few of the many benefits you will find when trying out the new system in your dental laboratory.


Dream Team

THE COMBINATION OF EFFECT LIQUIDS AND MICRO-LAYERING ON HIGHLY AESTHETIC ZIRCONIA IS THE EFFECTIVE WAY TO ACHIEVE OUTSTANDING RESULTS


Case by Leonidas Dimitriou, MDT


As an addition to its well-aligned portfolio of multi-layered zirconia (KATANA™ Zirconia Multi-Layered series) and veneering porcelain for zirconia (CERABIEN™ ZR), Kuraray Noritake Dental Inc. has recently introduced a set of dyeing liquids. Esthetic Colorant for KATANA™ Zirconia is applied to the surface of the monolithic or anatomically reduced zirconia restoration prior to the final sintering procedure. In this way, it is possible to imitate typical internal colour effects of natural teeth quite easily. Depending on the desired outcome, users may add just a final layer of glaze, liquid ceramics or stains and porcelains to their zirconia restorations treated with Esthetic Colorant. The following two case examples are used to demonstrate two different procedures involving the use of the effect liquids.


CASE EXAMPLE 1


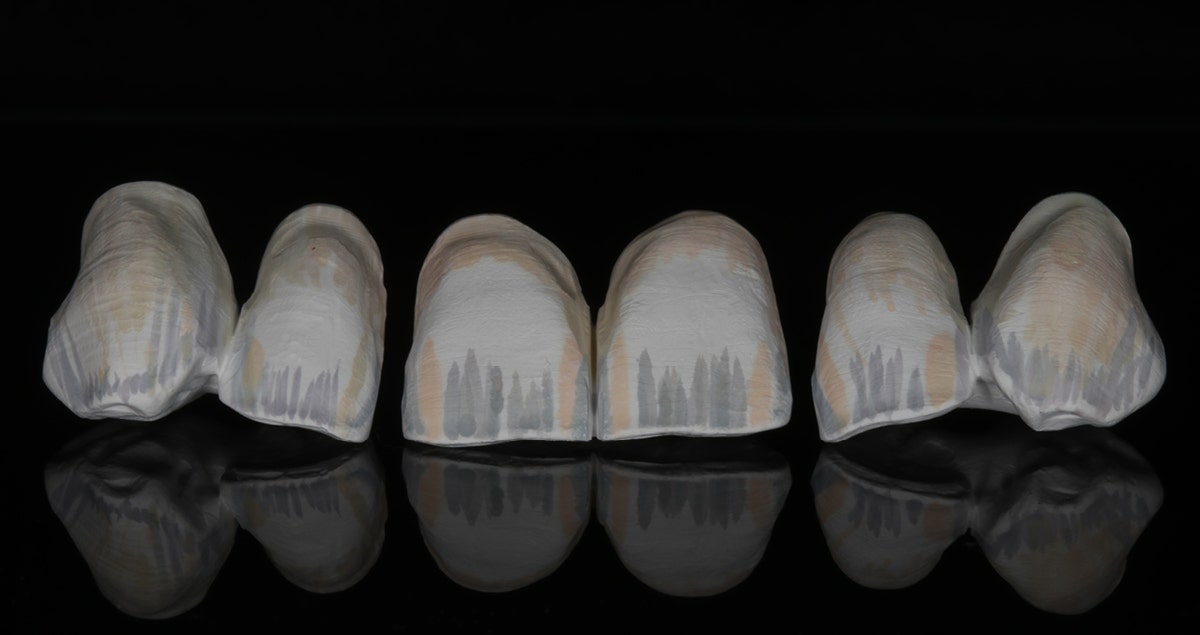
In the first case, we produced three two-unit splinted crown restorations for six maxillary anterior teeth. The zirconia crowns (made of KATANA™ Zirconia YML) were anatomically reduced and individualized with Esthetic Colorant mainly in the incisal and cervical areas immediately after milling. For the application of the selected liquids, we used the Liquid Brush Pen specifically developed for Esthetic Colorant. The restorations were dried for half an hour, placed in the sintering furnace for sintering according to the recommended protocol for KATANA™ Zirconia and subsequently finished with CERABIEN™ ZR porcelains. Finally, CERABIEN™ ZR Paste Stain Glaze was applied for the final high-gloss finish.


Fig. 1. Pre-sintered anatomically reduced crowns after milling.


Fig. 2. Esthetic Colorant applied to the milled restorations.


Fig. 3. Appearance of the individualized restorations after the final sintering procedure.


Fig. 4. Restorations after porcelain layering.


FINAL SITUATION


Fig. 5. Final restorations with a natural appearance. The effects created with Esthetic Colorant shine from deep within the restorations.


Fig. 6. Lateral view of the final restorations from the left.


Fig. 7. Lateral view of the final restorations from the right.


CASE EXAMPLE 2


In this second case, two three-unit restorations were produced using KATANA™ Zirconia YML in the colour A3. We designed and milled them in full contour, then reduced them with hand instruments by 0.2 mm and added some texture effects to the surface before applying Esthetic Colorant. In this case, we played with different shades of Esthetic Colorant. Even when applied on a minimally reduced or monolithic surface, the liquids are able to create a nice depth effect as they diffuse into the zirconia structure. The amount of liquid applied is easily controlled with the Liquid Brush Pen, so that the intensity of the colours is predictable. After sintering, we added some internal stains, CERABIEN™ ZR Luster Porcelain and a final layer of CERABIEN™ ZR FC Paste Stain Glaze to finish the restorations. The outcome speaks for itself.


Fig. 8. Milled monolithic restorations with a pronounced surface texture.


Fig. 9. Vestibular and palatal surfaces individualized with Esthetic Colorant to create and intensify some natural colour effects.


Fig. 10. Appearance of the restorations immediately after sintering.


Fig. 11. Restorations after internal staining.


Fig. 12. A layer of luster porcelain applied to the minimally reduced restorations.


FINAL SITUATION


Fig. 13. Final outcome after glazing.


First impressions: Esthetic Colorant for KATANA™ Zirconia in use

Case by CDT Daniele Rondoni and MDT Roberto Rossi


Working with high-translucency, multi layered zirconia (KATANA™ Zirconia Multi-Layered series from Kuraray Noritake Dental Inc.) paves the way toward indirect restorations that are closely adapted to our patients’ needs. Reduced wall thicknesses allow for minimally invasive tooth preparations, while polished zirconia in the occlusal contact areas provides for an antagonist-friendly behaviour. All this is possible due to the high aesthetic potential and homogeneous structure of the materials, which work well with a full-contour design or slight vestibular cutback. For individualization or characterization, different options are available. The portfolio of finishing solutions from Kuraray Noritake Dental has just been complemented by Esthetic Colorant for KATANA™ Zirconia, a set of twelve dyeing liquids for the company’s multilayered zirconia. They are applied to the milled restoration surface prior to sintering.


Some readers may wonder why there is a need for effect liquids applied to pre-shaded zirconia with a multi-layered colour structure. Being aware of natural teeth’s unique play of colours stemming from the shape and shade of the dentin core, however, the reason is quite obvious: Esthetic Colorant diffuses into the zirconia structure, hence allowing us to create depth effects even in monolithic restorations. Moreover, it enables the user to pre-treat tissue areas, and even by using the liquids on cutback designs, we are able to reproduce case-specific internal optical characteristics quite easily. Our standard approach for the use of Esthetic Colorant on KATANA™ Zirconia HTML Plus is described by means of the following case example: An implant- and tooth-based twelve-unit bridge with a slight vestibular cutback design, finished with Esthetic Colorant and CERABIEN™ ZR Porcelain.


Fig. 1. Restoration with sintering support removed from the blank.


Fig. 2. Esthetic Colorant for KATANA™ Zirconia: Available shades.


Fig. 3. Frontal view of the milled restoration after the application of Esthetic Colorant. A chromatic map is not needed since the colours of the applied liquids are clearly visible.


Fig. 4. Occlusal view of the milled restoration after the application of Esthetic Colorant. The liquids were applied with the Liquid Brush Pen for Esthetic Colorant.


Fig. 5. Frontal view: Appearance of the restoration after sintering.


Fig. 6. Occlusal view: Appearance of the restoration after sintering.


Fig. 7. Beautiful translucency and mamelon structures in the incisal area.


Fig. 8. Situation after the application of a thin layer of CERABIEN™ ZR Porcelain, which creates an enamellike window effect and reveals the play of colours found underneath.


Fig. 9. Restoration after firing and glazing.


FINAL SITUATION


Fig. 10. Beauty shots…


Fig. 11. … of the final restoration.


Easy handling and application, impressive colour effects: Esthetic Colorant perfectly fits into our micro-layering approach with a cutback design adjusted to the age and needs of every patient. Being applied on the pre-sintered zirconia surface, the liquids do not require any extra heat treatment – the restoration is simply dried and then sintered as usual. Esthetic Colorant may be used instead of or in combination with internal stains, luster porcelains and liquid ceramics – whatever complements a laboratory’s existing approach to highly aesthetic zirconia restorations.